Hello, today we are releasing Phaser Editor v1.4.0 Preview! Yes, more than three months of development but there are a lot of changes! We think the new stuff worth the wait.
We decided to deliver a Preview before the final release because there are a lot of features and some users wants to test it and provide feedback, specially those waiting for Mac, TypeScript and Prefabs.
Something that we are not including in this Preview is the documentation of the last changes, please take these notes as the temporal documentation for the new stuff. For the final release we are going to update the whole documentation and videos.
A couple of users are collaborating with the project by suggesting ideas and reporting bugs. Thanks to all of them!!! We really appreciate all the feedback, so please do not hesitate to add new issues to our GitHub repo.
Welcome Mac OS!
Yes, finally the Mac OS version of our editor is available for you to test it!
Download Phaser Editor for Mac
This is one of the main reasons we are going to release a preview. We the Phaser Editor developers are not a long time Mac users so if you find something is not in the Mac OS spirit please open an issue about it, we love issues.
The installation process is simple, just uncompress the downloaded file and execute the Phaser Editor application. It should show the splash screen and later a small dialog asking for the workspace location, by default it should show (User Home)/Library/PhaserEditorProjects.

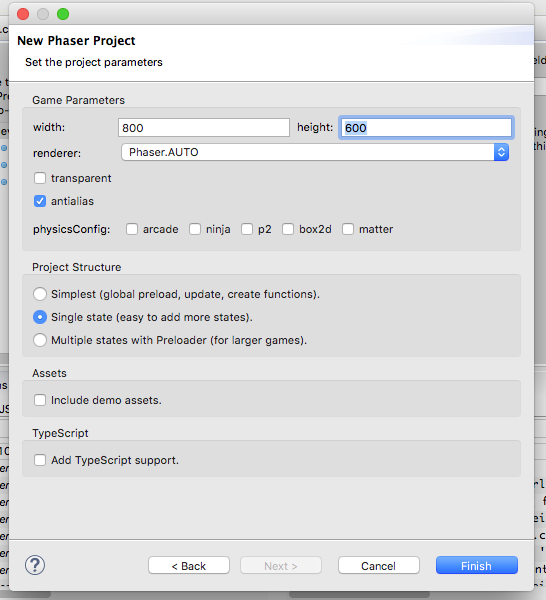
New Project wizards
In this release we intrododuce the new Phaser Project wizard. With this wizard the user is able to select the initial parameters of the game (size, renderer, physics). The project layout (simplest, single state or multiple state). The language (optional TypeScript) and the inclusion of demo assets.
Yes, TypeScript!!! We do not provide a TypeScript editor for now but you can open the project in any other external tool, like Visual Studio Code, and keep using Phaser Editor to pack the resources and create the scenes.
Updated: In this post we explain in details how to install the TypeScript IDE plugin inside Phaser Editor, to get a more complete TypeScript support.
We hope this is a better way to start a project. The old wizard was renamed to Phaser Example Project, and as usual the user can select a Phaser example as template. This is a great option to learn Phaser and Phaser Editor.
New visual editor concepts: prefabs and states.
One target of this release is to provide to the developer better tools to create bigger games. Prefabs are part of this effort and like in other game devlopment tools they are used to create reusable objects.
In this release we introduced two kind of visual prefabs: Sprite Prefab and Group Prefab. Note that in previous versions the visual editor it generated only a custom Group code, but now in addition it can generate the code of a custom Sprite and the code of a State.
Prefabs is a long topic and in these notes we are going to cover the basics, for the final release you will get the whole documentation.
Create a Sprite Prefab
To create a prefab select the menu File > New > Sprite Prefab. It opens the Sprite Prefab wizard, select the file name (used also to create the initial class name) and the texture of the sprite. This texture should be defined previously in the Asset Pack file of the project.
![]()
In addition there are other parameters you can set, like the base class (Phaser.Sprite by default) and the language (like TypeScript).
Press Finish to create the files, the canvas file associated to the sprite will be opened in the visual editor and the JavaScript file with the prototype definition will be created too.
A Sprite Prefab follows the Phaser standards to create custom sprites, it uses a prototype that extends the Phaser.Sprite class.
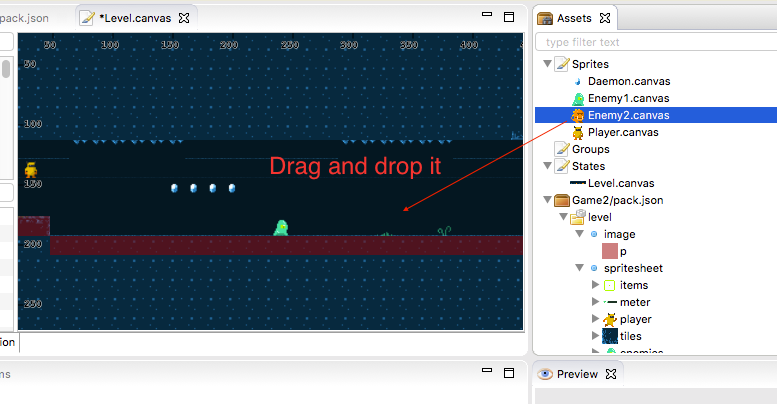
In the visual editor you can change the properties of the sprite like the animations or texture. To change the texture of the sprite you can press Ctrl+T or drag a texture from the Assets view and drop it on the scene.
Create a Group Prefab
To create a Group Prefab select File > New > Group Prefab. It opens a wizard that ask for the file name and other parameters like the base class and the language. It is similar to the Sprite Prefab wizard, just that you do not have to select a texture.
When the files are created it opens the group canvas file in the visual editor, so you can start adding objects to it.
Add a prefab to the scene
Sprite and group prefabs are shown in the Assets view, and like any other asset you can drag and drop it into any visual editor, a new prefab instance will be created.
Change/reset prefab instance properties
A key aspect of a prefab is the ability to override the inherited properties. In Phaser Editor by default all properties (excluding position) are closed, the user cannot edit them. To override a property first you have to open it and then you will be able to change it. To open a property or better, a set or properties, you have to select the object and in the properties grid modify the override property and check the property you wish to change. In the next image you can see a prefab instance that overrides the position and scale properties:
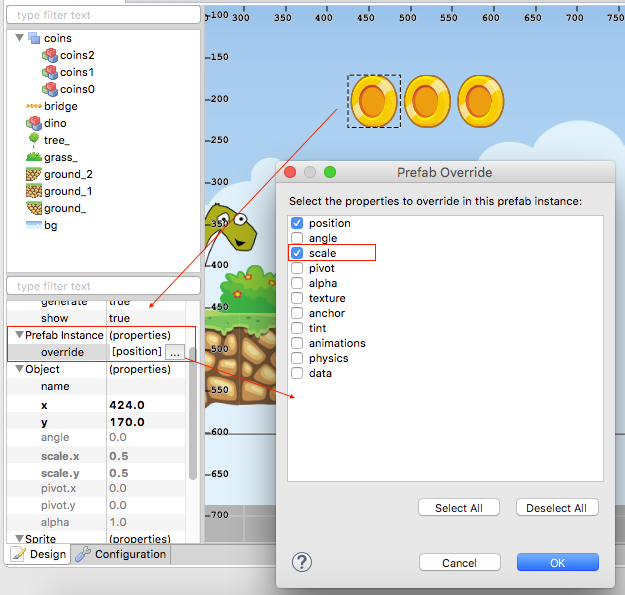
Note that to reset a property to its initial prefab value you only need to exclude it from the list of overriden properties. At the same time, as expected, if you change a property on the original prefab then that change will be propagated on all the prefab instances that do not override it.
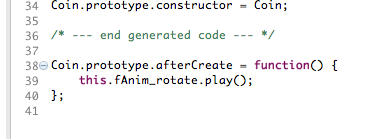
Add logic (code) to the prefab definition
To insert you own code in the generated JavaScript (or TypeScript) file you can open the User Code dialog. Press Ctrl+Shift+U or right click on the scene and select Edit User Code.
This dialog shows different sections of the generated code. In case of prefabs there is a unique Create section that refers to the constructor (in case of sprites and groups) or the create method (in case of states). It allows the user to insert custom code before and after the creation.
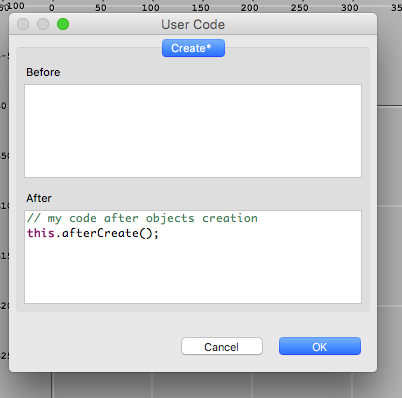
A good practice is just to write a call to a custom method. The implementation of this method can be written in the JavaScript editor. Just open a generated JavaScript file, you will note at the end of the file there is a line with a comment /* --- end generated code --- */, just write your custom code after it.
States visual editor. Preloader states.
In addition to sprites and groups you can create Phaser states and edit them in the visual editor. Select the File > New > State File option, it opens a wizard where you can set the state name, base class, language, background color, page alignment and other parameters.
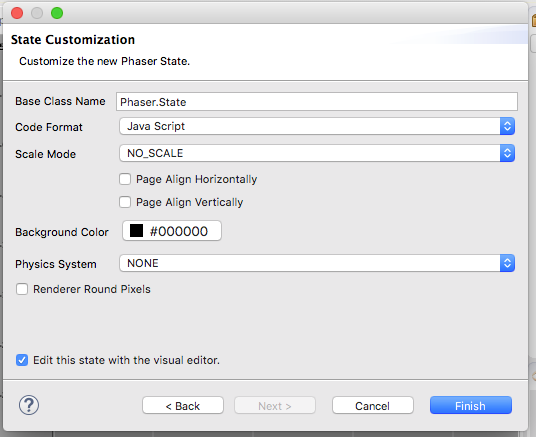
The main difference between the state and the sprites and groups is that it generates a couple of methods like the init, preload and create. Like we explained before, to insert your own code in these methods you have to use the User Code dialog.
Note that now the visual editor has two tabs, one for the scene and other for Configuration. In this second tab you can edit the editor parameters and the state parameters.
For now there are only a few state parameters, but we plan to include a lot of them, to fully cover aspects like camera, input and physics, to mention some of them.
Preloader states
An important set of parameters of the state configuration are those dedicated to the loading of assets. We invite you to create a project but set as options Multiple states with Preloader and check Include demo assets. It creates a project with a preloader state that you can edit with the visual editor. This is the configuration:
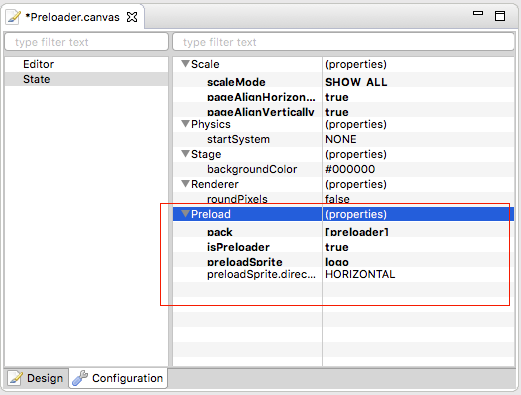
First, to make the state a preloader state, set the isPreloader property to true. Then you will be able to select the sections in the asset pack to be loaded, the preload sprite and the preload sprite direction.
Note that in difference of a regular state, a preloader state creates the objects inside the preload method. Then you have to add custom code to jump to the next state after the loading is done.
New asset refactoring tools
Something that put a difference between a text editor and an IDE are the deep refactoring tools that commonly the IDE provides. Refactoring tools are convenient specially for large projects, and in case of game development it helps to evolve from the demo to the real game. Phaser Editor, however its name, pretends to be an IDE :) and we are doing an effort to reuse all these great feautres provided by the Eclipse platform, like the refactoring tools.
In this release the editor supports delete/rename/move asset files (like images), asset pack entries and canvas files (prefabs and states).
When you delete or rename an object (asset file, audio, scene, prefabs) it opens a refactoring dialog that show the files to be affected. You can aprove or cancel the operation, even you can undo/redo it.
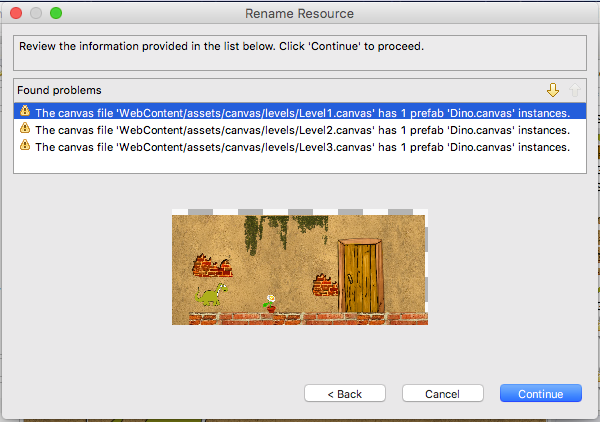
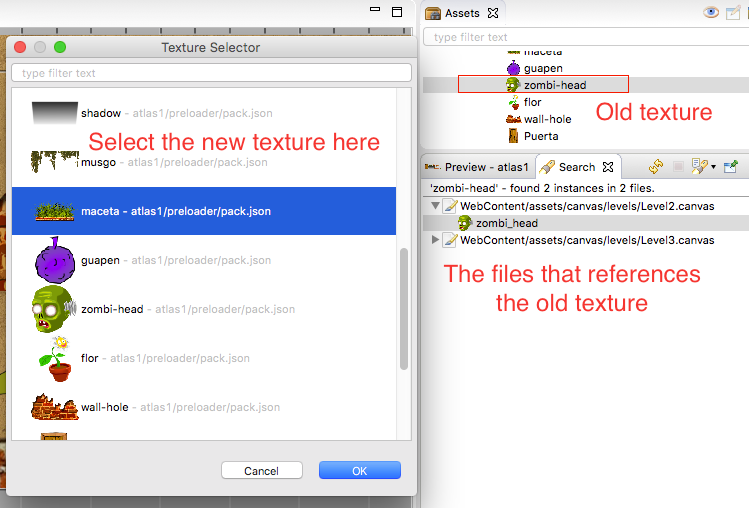
In the next image it shows the confirmation dialog after request the rename of the prefab Dino.canvas that is used by other scene files like Leve1.canvas, Level2.canvas and Level3.canvas. When the user aprove it, all those files will be updated to reference the new name.
To rename/delete assets you can do it in the Assets view. Just select them and right click to select the operation or press the Delete or F2 keys.
In addition to rename/delete/move files, we implemented new ways to change the texture of sprites. If you want to change the texture of a particular sprite inside the visual editor, select it and press Ctrl+T. It opens a dialog with all the available textures. But if you want to replace for example a demo texture by the final texture in all the project, you can select the old texture in the Assets view, right click and select References > Replace. It opens a dilog to select the new texture and when you press OK, the old texture will be replaced by the new one in all the scenes of the project. We think it is great :)
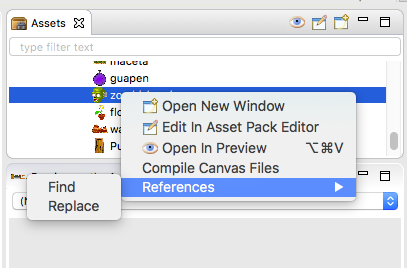
In the same way you can search for all the reference of a texture or prefab. Just click it on the Assets view and select References > Find. It searches for all the references and show it in the Search view. You cacn click on it to open it in an editor or you can ask to replace it, in case it is a texture.
Introducing partial TypeScript support
In this release we start supporting TypeScript, something that is a request from many users. However, this support is partial, because yet we do not provide a TypeScript editor, but we provide TypeScript code genetators for projects and scenes. This mean that you can create the project and the scenes in Phaser Editor, and at the same time you can edit and compile the TypeScript code in an external tool, specially Visual Studio Code or any other that consumes the TypeScript Language Server.
We hope in the near future to introduce TypeScript code editors and tooling (compiler). We are following the progress of the TypeScript plugins for Eclipse but for now those are not stable, they will be. But we want to start supporting TypeScript as first citizen, to edit the code in external editors is not a bad idea, it is part of our phylosophy, to be friendly with the text editor of your choice.
If you find any problem with the generated TypeScript code please open an issue in our repo.
Git tooling and UI
EGit is a great plugin to manage Git repositories. We included it in Phaser Editor by default. To learn more about EGit you can visit its website. As a quick start just try by importing a project (File > Import > Git > Projects from Git).
Other changes
General
- A new UI theme for Windows called Phaser Editor. We like it more than the default theme, try it :).
- New class wizard.
- Phaser Editor demo templates were migrated to use prefabs and visual states. The Friend of Cuco template is a demo of how to develop a multi-level game.
- A new menu option in Assets view to compile all selected scenes.
- Improved the Atlas Generator file, now it uses project-relative paths for the source images, so it makes that file more portable.
- When run the project it ask for confirmation if the project has errors.
Visual editor
- When an object is selected a description message is shown in the status bar of the application.
- Better grouping of the commands in the context menu.
- The old settings dialog was replaced by the Configuration tab.
- Added the Morph to Sprite option.
- A new command to select all the sprites of the same texture, in the same editor.
- Support add prefabs to the scene palette.
- When paste an object add it to the current selected group or the group of the selected object. It helps to avoid a constant group-to moving of objects.
- Move the objects along the X or Y axis when the shift key is pressed.
- The
nameproperty of the scene objects now refers to the name of the sprite in the runtime. To set the variable name is usedvarName. - Now you can move the objects with the arrow keys. If the
Shiftkey is pressed it moves 10 pixels. If stepping is enabled then it will move the defined space. - Added a new
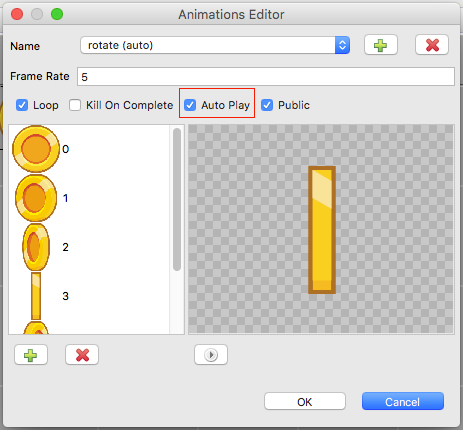
alphaproperty to objects. - New Auto Play parameter in the animation dialog. When this option is checked the animation starts playing at the creation. Only one animation could be Auto Play.

- Added the option to morph between tile sprites, buttons and sprites.
- Mouse hover on canvas files (in Project Explorer and Assets views) show a scene preview.
Migration Guide
- The visual editor added new elements to the canvas format, you will see warnings in the Problem view about to migrate the old files. You are not forced to do it, but if you like to update the files just open them and save.
- New menu and wizards was added, if you are opening an old workspace then reset the Phaser perspective to be sure all the new elements are shown.
Troubleshooting
In the previous version some users experimented a strange behavior of the editor, like corrupted scenes. This happens mainly when you do file modifications outside Phaser Editor. If it happens to you, please just clean the project. In the main menu select Project > Clean and select the project. The reason is that Phaser Editor keeps an internal model of all the assets and secenes. This model needs to be updated in the background when a file is modified, moved or deleted. The same happens with the assets icons, those are created/updated in the background. So with a clean of the project, this internal model is built again and the different views and editors will be updated. In any case, if you experience any strange behavior please open an issue in our github repo, we are going to help on it.